Thanks for checking out my site. That photo is not me, by the way, its Christopher Lloyd, in Back To the Future. I just like the picture, its kind of a reference to the mad scientist in me. I'm working on alternative fuel technology products, still in the R&D stages. As for now, if you would like to purchase something, my first preference would be for you to shoot me an e-mail telling me what you want. PayPal is the easiest way to go, use the email address shown below. If you don't want to do PayPal, I can list it on Ebay, then you could buy through them. I won't list it on Ebay unless someone wants to buy one that way, so you will have to email me and ask me to list it. Or I can just take a check. I'm not prepared to deal with orders and payments on this site yet. Thanks!
My e-mail address is: boguestuff@gmail.com
Mailing address: 574 SW 1st St
Madras OR, 97741
Thanks!
Air Pump-compatible with Volvo 850's, and S70's (Currently, this pump is hard to find, but I'm showing it so you might be able to figure out how to modify another one yourself)
(I didn't make this, but I discovered that it works, and I found how to modify it to fit)
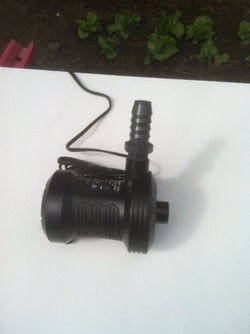
Low cost air pump- small size makes it easy to locate next to battery on the 850 and S70 models. This positioning puts it higher than the check valve so that water doesn't drain back into it and ruin it. (A common cause of failure) Compatible with the cars' computer, it will not trip the check engine light.
It pumps about 1/2 of the volume of the factory pump, so to duplicate the performance of the original, you would need two pumps in tandem. However, as I said earlier, one pump will keep the check engine light from coming on, as it satisfies the conditions that the cars computer is looking for.
In order to install this pump, you need to be able to make electrical connections using a crimping tool. As of right now, I'm not supplying a bracket for it, it simply rests in the space between the battery and the headlights on the 850/S70 versions. I haven't yet determined if it will satisfy the California smog rules, we're going to test this soon. I haven't tested it on any 960/S90 models yet, but the original pumps look identical in size between the different models, so I think that it should work. I will update this site as I learn more. Prices and availability subject to change. No tutorial video yet, I will get one together ASAP.
Air Pump-ea $57.50
Shipping $ 7.50

Crankcase pressure checker
Your Volvos PCV (positive crankcase ventilation) system is designed to
suck the gasses from inside the engine and vent them into the air intake system to be be burned in the combustion chamber. The system consists of an oil separator that bolts onto the engine block beneath the intake manifold, and some hoses. Over time, the oil trap and the hoses get a build up of carbon inside of them, which limits the amount of gasses that can be vented from the crankcase. When this happens, the engine starts operating with too much pressure in it, which cause oil to push its way out any way it can. This can be past engine seals, past rings, or through valve guide seals. This simple, hockey puck sized tool lets you quickly see whether you have pressure or vaccuum in your crankcase. With the car running, take off the oil cap, and place the tool over the opening. If there is a vaccuum in the system the ball will move to the left(good), if pressure, it will move to the right (bad). The system should be checked both at idle and cruise (1500-2000 rpm), and under boost if its a turbo. If its a turbo, you'll powerbrake it for a few seconds-that is, have someone sit in the car, put their foot FIRMLY on the brake, put it in drive, and hold the engine speed around 2500 for a few seconds while you check the pressure under boost. This has been in use for years at various shops. Heres a couple of links for you: http://youtu.be/kLpt_QP1OYw http://youtu.be/d0SoAjX2xwM
Crankcase Pressure Checker, Version A $50.00
Version B $25.00
(U.S.) Shipping, either $ 5.80

This is a simpler version of the same tool, it works as well or better than the other.The other tool makes it easier to persuade a customer to fix their PCV system, because it says "Good" and "Bad" right on the tool.

850 glove box latch repair kit
Replaces the fragile part that always breaks with a durable
steel piece that will outlast the car for sure. Kit includes a tool for opening glove boxes with bad latches, so you don't have to hack saw your way in.
Replaces the fragile part that always breaks with a durable
steel piece that will outlast the car for sure. Kit includes a tool for opening glove boxes with bad latches, so you don't have to hack saw your way in.

This is the tool for opening glove boxes with broken latches.
Here is a link for a video showing how to use the opening tool and how to fix the latch using my kit. http://youtu.be/WVi8ahPhxEI
Glove box latch kit $50.00
Latch piece or opening tool, separately, ea. $25.00
Shipping $6.00
Here is a link for a video showing how to use the opening tool and how to fix the latch using my kit. http://youtu.be/WVi8ahPhxEI
Glove box latch kit $50.00
Latch piece or opening tool, separately, ea. $25.00
Shipping $6.00

850, early S70 door stop repair kit.
Volvo didn't make the steel thick enough where the door stops bolt to the body, so over time a lot of them crack and make a popping noise when you open and close the door. Until now, the only fix was to weld things back together. This works fine if you have the equipment, skills, and time to do it. This is a quicker alternative. Works best if the door stop anchor is not all the way broken off, and if
no welds have been put on it. The worse the damage to the anchor, the more skill it takes to fit this piece. With average damage, this installs in minutes. No video tutorial yet, but the photos below should give someone with some mechanical ability a good idea about how to do the job. I will be glad to communicate with anyone who needs help doing it. However, the first step to doing the job is to remove the door, so if you are not up to the task of doing that, you better hold off.

Shown is the re-inforcement piece mounted on a section of a door pillar removed from a car. The door stop end piece fits over the tab with the oval hole in it and sandwiches it between the anchor itself. The retaining bolt holds the 3 pieces together. The four screws are self tapping, and are installed using a cordless screwdriver or drill with a 5/16" socket attached. I recommend using quick setting epoxy behind the plate to add extra strength.
Door Stop Kit $50.00
Door Stop Kit $50.00
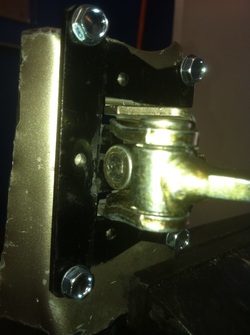
Here you can see how the torx headed bolt holds the 3 pieces together. Care must be taken to not cross-thread the bolt when installing.
Note: The half circle tab located on the door pillar, to the left of the torx bolt must be pried in slightly to allow the plate to fit properly.
Another note- there is tight clearance between the end of the door stop arm and the plate. If the door pillar section is badly warped, there may not be enough clearance to allow the bolt to fit into its hole. 1/8" and a little more can be ground off of the end of the arm without compromising its strengh, if need be. If this is not enough, then the door pillar metal has to be straightened enough to make it fit. Channel locks, a hammer and a chisel will probably do the trick.
I probably won't sell a lot of these, but I think that its kind of a cool part. I still need to manufacture the bracket for the transmission speed sensor, but I want to see if there is any interest in the part before I put any more time/money into it.

Axle shaft pulse wheel-transmission adapter
This wheel slides onto the passenger side axle shaft, and provides a signal to your transmission control unit, so that you can use a transmission that does not have a provision for that sensor. For example, '93 850's used the transmission with the sensor inside of it. A '95 non turbo did not, so, using this part, you can use the '95 transmission.
This wheel slides onto the passenger side axle shaft, and provides a signal to your transmission control unit, so that you can use a transmission that does not have a provision for that sensor. For example, '93 850's used the transmission with the sensor inside of it. A '95 non turbo did not, so, using this part, you can use the '95 transmission.

Distributor jig for 740's and earlier 940's
Holdsthe distributor so you can drive out the pin that holds the shaft in, making it much easier to replace the seal. (They all start leaking after about 60k miles) Here is a link to a tutorial showing how it all works:
http://youtu.be/L_tefvtvn2M
Distributor jig $17.50
Seal kit $ 9.50
Shipping $ 5.35
lick here to edit.

140 and 240 wagons tailgate latch repair kit (240's up til '85)
The rings on the original latch button often break, making the latch assembly inoperative. This piece mates with the original latch button creating a durable part that will not break. Here is a link to a video showing how to do it:
http://youtu.be/FLDPcD-0ugo
Tailgate latch kit $27.00
Shipping $ 3.00